If you want to learn how to build a free affiliate marketing landing page, then this post is something you want to read. Specifically, I am going to discuss why it is important to have a landing page, and how to build an email list from the traffic you collect on your landing page or squeeze page. By the time you have finished reading this article, you will know exactly how to build an affiliate marketing landing page and how to create a successful online business where you will have the opportunity to make money from it. Do not worry, by the end of the article, you will know more about building a landing page and building an email list with just a few steps.
What is a landing page?
One of the first steps and part of the strategies used with affiliate marketing are learning how to create a landing page. If you are not familiar with them, they are basically just a single page or other type of web page such as a pre-sell page, squeeze page, bridge page, or opt-in page where you can capture the visitor’s information through an opt-in form. Many people think that these pages are not really required, are somewhat useless, saturated within the market, or even difficult to build. For all of these, it is simply not true. In fact, a landing page can be a powerful tool when it comes to affiliate promotions. All you need to do is spend a little time learning a few steps so you can start designing an attractive and useful landing page or squeeze page for your website or product promotions. So, let us begin.
How to setup an email account in Gmail
First, you will need to create an email account in Gmail. Of course, many people already use a Gmail account, but in case you do not have one I will quickly explain how to set it up now.
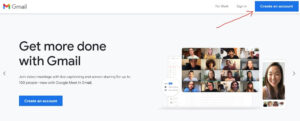
Head over to Gmail’s website and click on the blue tab that says “create an account” in the upper right corner. On the next page, add your first name, last name, a username, and password/confirm. Then click on the blue next button. Now you will be asked to enter your phone number and click the next button again. A verification code will now be sent to your phone number via text. After you receive the text, type in the Verification Code into the designated box and click the “Verify” option.
Once your account has been verified, you will need to add a few details such as date of birth, recovery options, and gender. When completed, click on the next button and you will need to scan Google’s Terms and Privacy. Click on the blue arrow and scroll down until you see “I agree” and select. That is it, you now have a Google account including Gmail.
These are the instructions step-by-step for setting up a Gmail account
- Go to Gmail’s site and click on the “Create an account” tab
- Type in the necessary details including name, username, and password, then click next
- Add your phone number and choose next
- This is where you will receive a text message with a verification code
- Add verification code into the box and select “Verify”
- Add additional information such as date of birth, recovery email, and gender and click next
- Go over the Terms and Privacy info and click the blue arrow until you see “I agree” and select
Why do I need a Gmail email account?
In basic terms, Google is more than a search engine. There is a vast number of resources that comes with having an email account. For instance, your Gmail account allows you to enter and use a variety of apps that are provided for free. Apps and sites such as Maps, Google Drive, Google Docs, Google Sheets, Photos, Play, Sites, Blogger, and of course, YouTube.
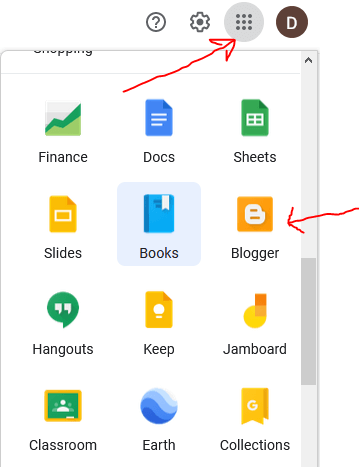
Regarding building a free landing page, we need to look at using Blogger. You can reach the Blogger site by entering through your Gmail account. If choosing your Gmail account, login in and click on the dotted cube in the upper right-hand corner. Scroll down until you see the Blogger icon and click on it.

You can also login to Blogger by going to the website directly at blogger.com.
Once you login, you will be asked to choose a name for your blog. You can choose anything you want it to be, but it might be wise to choose something that relates to what you are trying to do. If you would like, you can select the “skip” option and move on.
 If you decide to give a title for your blog, enter it on the red line provided and click next.

On the next page, you will be asked to create a URL address for your blog. This will be the actual domain name for your Blogger blog. For example, if you entered the subject name “mylovablepets” then your Blogger domain name would be, mylovablepets.blogspot[dot]com. Keep in mind, not all domain name choices will be available to use.
Blogger Dashboard
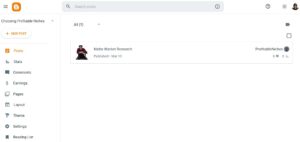
After logging in to blogger, you will see a basic dashboard. This is also where you will see any blogs that you have created along with their individual posts or pages. From here, you can manage your new blog by selecting new posts, creating pages, choosing a theme, the type of layout you prefer, and the general settings tab.
Choosing a Theme

Next, you will need to choose a theme for your page. Hover to the left side of the dashboard and click on Theme.

On this page, you will see a list of themes that you can choose from. Scroll down the page until you find the “Simple” blog theme. Choose this theme by clicking on it.

This will be the theme we will use to build our landing page. I prefer to use this theme for creating landing pages, but you are free to choose any theme that fits your needs.
Layout

Next, hover to the left side of the dashboard and select “Layout” by clicking on it. This will provide a structure for your blog, including menu navigation, header, footer, sidebar, and any pages or posts that you create.
Navbar Configuration
Let us start with the Navbar section located on the top of the layout page.

Click on “Edit” located on the far right of the navbar tab. A popup should appear detailing the navbar configuration. Scroll to the bottom and select “Off” and then click on save.
Configure Header

Now, let us look at adding an image or text to your header. If you would like to leave the header as is with the title of your page, simply ignore this example and move to the next step. If you would like to add a header image, simply click on add or remove image and upload your own header image. The dimensions that work best for the header size are 851 x 170. If you add a header image, select the “Instead of title and description” tab and click the save button.
Configure Sidebar

In the next step, we need to remove two widgets from the “Sidebar” section of the layout. Navigate to sidebar right and you will notice two widgets “About Me” and “Blog Archive” Click on the edit tab for about me and a popup will appear. Click on the “Remove” tab and approve.
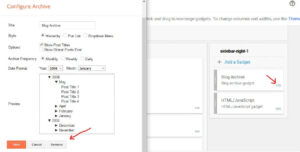
Next, click on the edit tab for the Blog Archive and another popup will appear. Click on the “Remove” tab again and approve.
Main Section
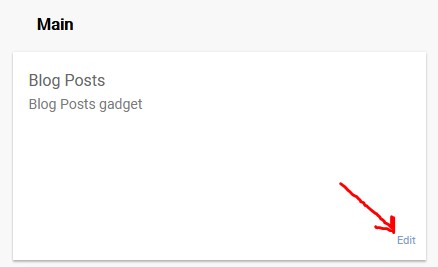
While still in the layout area of your blog, navigate to the “Main” section and click on the edit tab.

A popup will appear that shows the main page options. On the left side under the “Post Page Options” UNCHECK all the boxes in the column.


After all the boxes have been unchecked, scroll down, and click the save button.
Adding an Opt-in Box or Squeeze Page Signup Form

Next, while in the layout area, hover over the sidebar widget and click on add a gadget.

A popup will appear where you can choose a few gadgets to add to your sidebar area. For this landing page example we are only going to choose the “HTML/JavaScript” gadget.
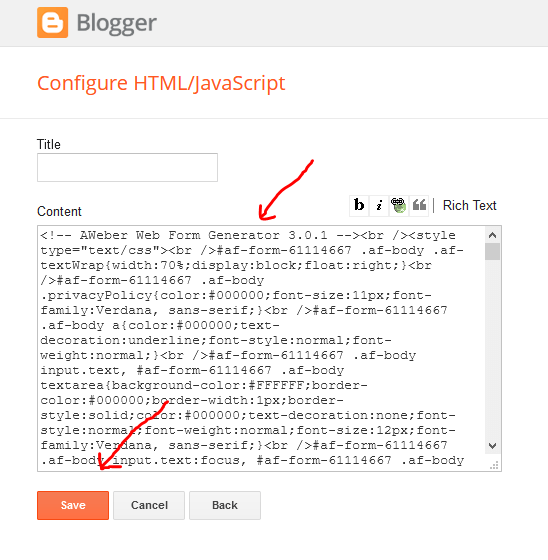
Another popup will appear where you can add the form code from your autoresponder. Simply copy the code from your autoresponder and paste it into the content area of the popup. After that, click the save button.
Adding Content to Your Landing Page

Now it is time to start adding content to your landing page. To do this, click on the “New Post” tab.

You should now see a page editor with a blank page. First, add a title for this page in the upper left-hand corner marked Title.
Start crafting your landing page by adding a catchy headline.

Here, you will notice that I have added a headline for my landing page. Now, let us add an image to our landing page.

Click on the image icon to choose an image.

I chose to add an image of myself since it is a newsletter I am offering. However, you are free to choose any image you like, just make sure that it relates to the content on your landing page or squeeze page.

Once you finish adding your content, simply click the “Preview” button to see how your landing page will look.
Changing the Background of Your Landing page
Navigate back to your Blogger dashboard and scroll down the left side and click on the Theme tab.

Your current theme (Simple Blog) should be displayed at the top. Click on the “Customize” tab.

On the left side menu under Background (if no choice to add or remove the image is available, simply click on the Background image box.

A popup will appear where you can choose from a variety of background images. If you want to upload your own image, simply click on Upload image.
![]()
Once you are done setting the background for your landing page, hover to the bottom right-hand corner of the page and click on the save icon.
Publish Your Landing Page or Squeeze Page

Navigate to the dashboard of Blogger and click on Posts. From there, hover over the post-block in the middle of the page. Click on the icon to publish your post (landing page).

And there it is, a simple free affiliate marketing landing page using Blogger. Even though Blogger is a free resource, it can still be an effective tool for those individuals who might be hesitant to invest in a landing page builder at this time. On top of that, you can create and build as many landing pages as you need, and this also includes squeeze pages, opt-in pages, bridge pages, presell pages, or any other type of pages you need for your online business.
Just remember, practice is the key here. Take the time to go through the system, understand how it works, and continually practice building your own free landing pages.
Start Collecting Subscribers

Once you have your landing page or squeeze page has been created, you are ready to begin collecting subscribers. You can do this through many ways. Some people prefer to use content marketing, social networking, and others prefer word-of-mouth marketing or even paid advertising. In my opinion, the best way to go is to combine multiple methods. Do not rely on just one way to get your page out there and in front of targeted people.
When it comes to building an email list with affiliate marketing, besides building a landing page or squeeze page, the other thing you will need to do is sign up for an autoresponder. This will help you keep track of your list and build an even larger database. Most of the premium autoresponders on the market today do require fees, but that does not rule out a few that offer free subscriptions that will allow you to test out the service before you must buy it. If you are a beginner and have not started building your list, taking advantage of a free subscription can be beneficial to your success. Generally, the free subscriptions provide you with an opportunity to build an email list first and then start paying for total usage. Keep in mind, the free use is often limited to the first 500 or 1000 subscribers, depending on which service you choose to sign up with.
Once you have your autoresponder account set up, you can then start building your opt-in list. The easiest way to build an email list with affiliate marketing is to offer a freebie such as an eBook, images, video, course, report, or newsletter on your site, and invite people to sign up. Once they have entered their information, they can automatically be added to your list.
This entire strategy is basically part of list building. Your goal is to drive traffic to your landing page or squeeze page where individuals who are interested in what you have to offer will join your list. To increase your chances of them joining, try to place something enticing on your page, something that will help them in their business venture or something that will help them solve certain problems they are facing. It needs to be something that will make them want to sign up and give you their name and email address.